When both your old and new hosts run cPanel, you do not need to move files and databases by hand. cPanel packages an entire account (website files, databases, email accounts and messages, DNS zone, SSL certificates and settings) into one archive, and the new server restores it in a single step.
If you have root access to the new server, use WHM’s Transfer Tool to copy accounts directly between servers. If you only have a cPanel login on the old host, use Transfer or Restore a cPanel Account on the new server, either connecting with that login or uploading a full backup.
| Method | You need | Best for |
|---|---|---|
| Transfer Tool | Root (or a sudo user) on both servers | Moving many accounts between servers you control |
| Transfer from Remote cPanel Account | WHM on the new server, cPanel login on the old | Moving from a shared host where you have no root |
| Full backup and restore | A full backup file from the old account | When the servers cannot reach each other directly |
Before you start
- The new server runs the same or a newer cPanel version than the old one.
- It has the PHP versions and extensions your sites use. Compare the EasyApache profiles on both.
- It has free disk space of at least twice the size of the account archive. The restore extracts the archive next to itself.
- You have lowered the TTL on the domain’s records to 300 seconds a day ahead. See DNS propagation.
- You know whether email is moving too. With cPanel, mailboxes move with the account.
Method 1: WHM Transfer Tool
On the new server, open WHM and go to Transfers » Transfer Tool.
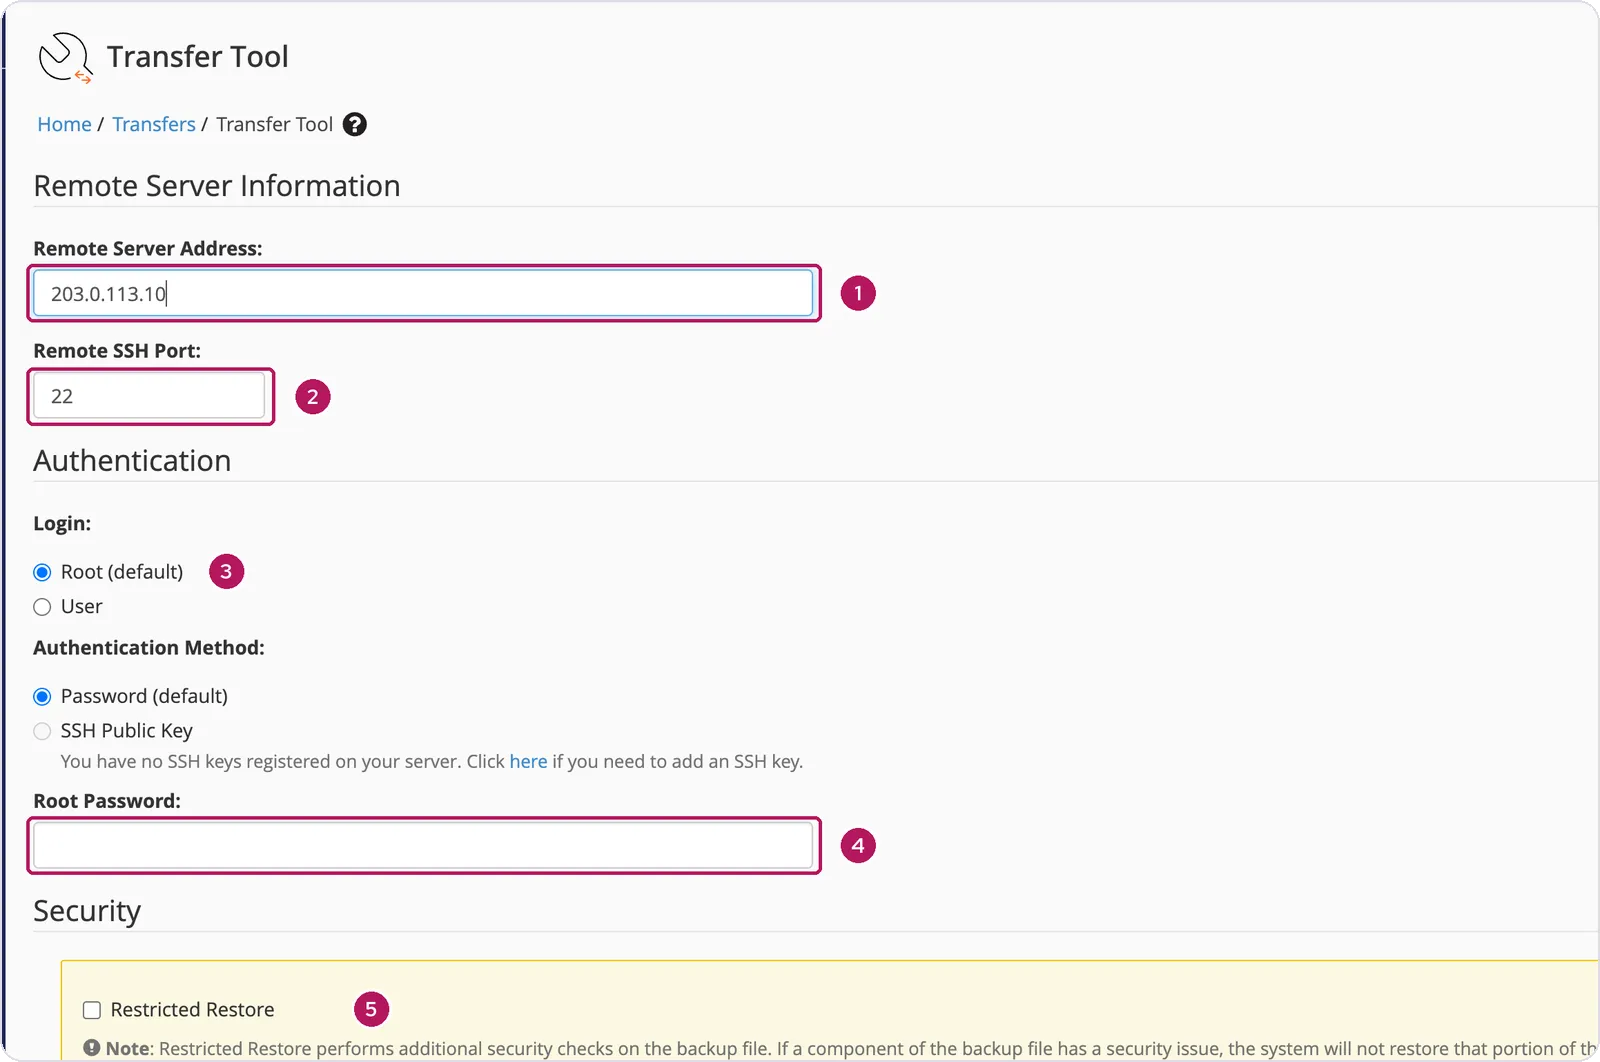
- Remote Server Address: the old server’s IP address or hostname.
- Remote SSH Port: usually
22. Use the old server’s custom port if it has one. - Login: choose Root, or User for an account that can become root with
sudoorsu. - Root Password: or choose SSH Public Key and select a key that is already authorised on the old server, which avoids typing a password.
- Restricted Restore: optional extra security checks on each account archive. Leave it off for accounts you know, on for archives you did not create.
Press Fetch Account List at the bottom of the page. WHM connects to the old server and lists its accounts and packages.
- Tick the accounts to copy. Leave the default options unless you know you need to change them.
- Press Copy. Each account is packaged on the old server, sent across and restored. The progress screen shows a log for every account; a failed account does not stop the others.
When it finishes, open Transfers » Review Transfers and Restores to read each account’s log for warnings.
Method 2: Transfer or Restore a cPanel Account
On the new server, go to Transfers » Transfer or Restore a cPanel Account. This one screen covers three cases.
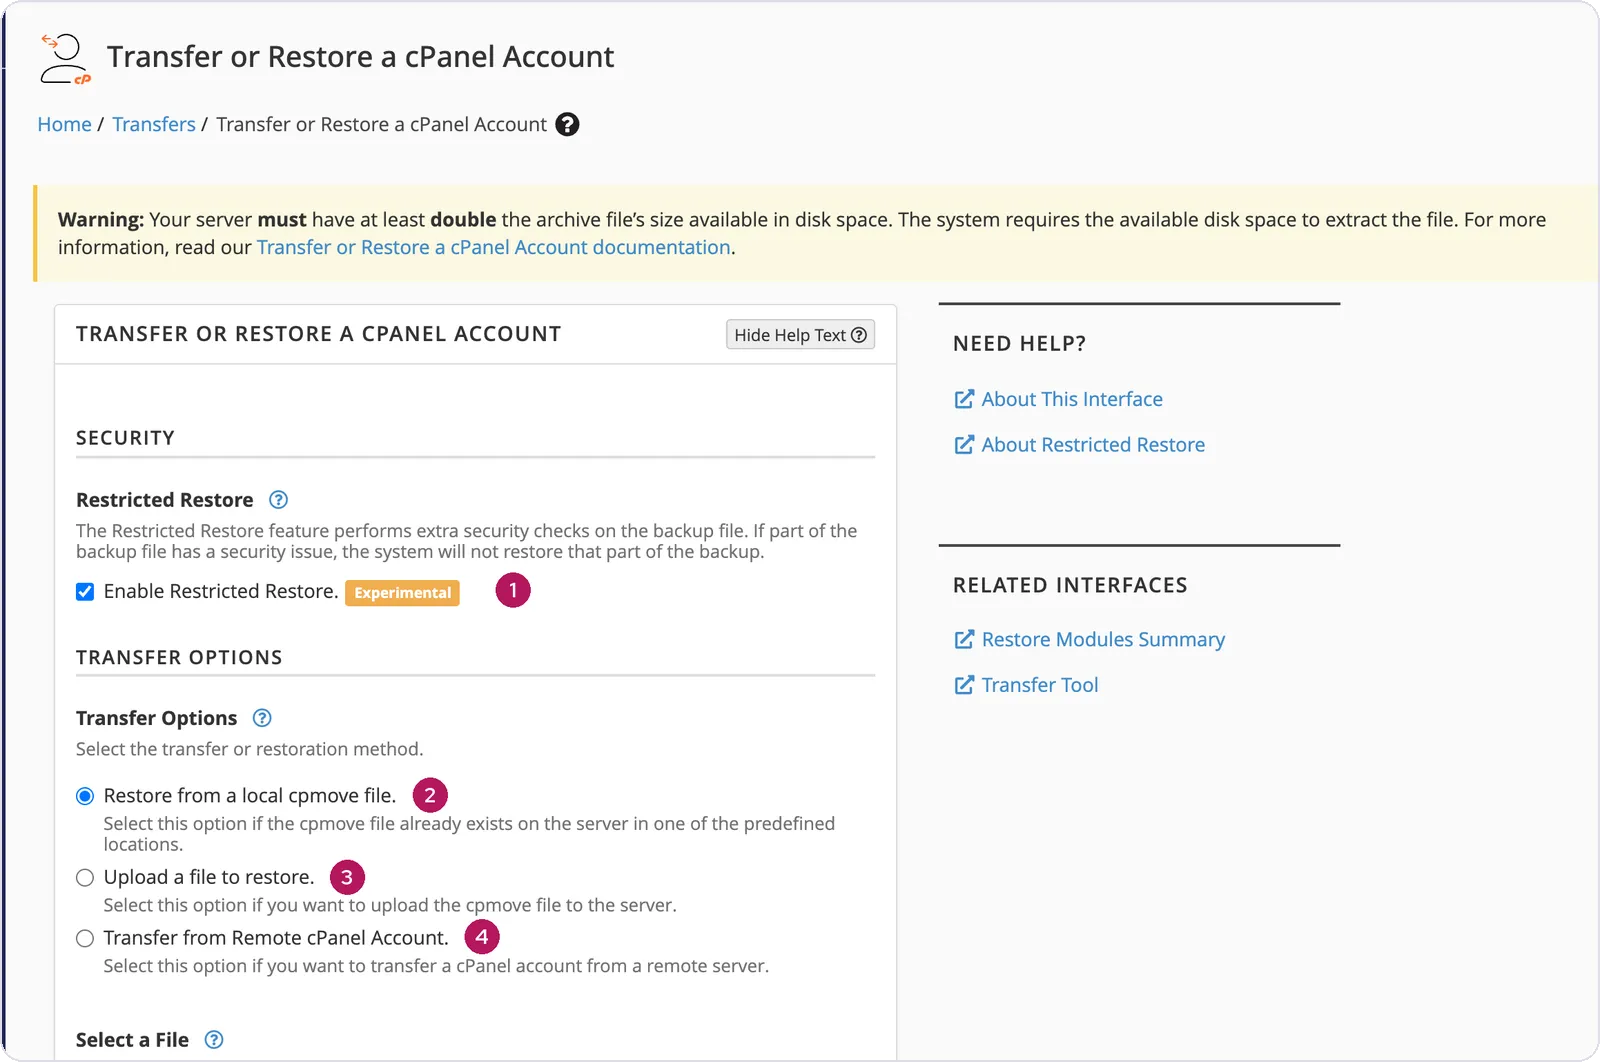
- Enable Restricted Restore: runs extra checks on the archive. Recommended when the backup came from someone else.
- Restore from a local cpmove file: the backup is already on the new server, for example in
/home. - Upload a file to restore: upload the backup from your computer.
- Transfer from Remote cPanel Account: enter the old host’s address and the account’s own cPanel username and password. WHM logs in as that account and copies it. No root access to the old server is needed.
Making the full backup on the old host
For options 2 and 3, first create the archive. In the old account’s cPanel, open Files » Backup and choose Download a Full Account Backup. Pick Home Directory as the destination and press Generate Backup. When it is ready, it appears in the account’s home folder as a file named like backup-10.2.2026_09-30-00_username.tar.gz. Download it, or copy it straight to the new server:
scp backup-*_username.tar.gz root@new.server.ip:/home/With root access, the command-line equivalent is quicker for large accounts:
# on the old server
/scripts/pkgacct username

# on the new server, after copying /home/cpmove-username.tar.gz across
/scripts/restorepkg /home/cpmove-username.tar.gz
After the transfer
- Test before switching DNS. Point the domain at the new server in your hosts file and check the site, logins and email. See the hosts-file step in moving WordPress.
- Check the IP address. Accounts restore onto the new server’s shared IP unless you assign a dedicated one in IP Functions.
- Switch DNS. Either change the A and MX records to the new IP, or, if the new server runs your DNS, change the domain’s nameservers. See nameservers.
- Let SSL reissue. AutoSSL on the new server issues fresh certificates once DNS points to it.
- Copy late email. Messages delivered to the old server during propagation can be copied across with
imapsync. See moving email. - Keep the old account for a few days, then remove it.
A transfer copies the account as it was at that moment. Avoid changes on the old site between the transfer and the DNS switch, or plan a final sync.
Something out of date? Software changes. If a step no longer works, tell us and we will check it and update the page.